Since the middle of 2006, I’ve been writing about all the great integration
features in IBM DB2 9 for the Microsoft Visual Studio 2005 integrated
development environment (IDE) and the accompanying ADO.NET 2.0 API.
In an article called Binding
DB2 Data to Visual Studio 2005 Windows Applications, I showed you how
to quickly build a Windows application that binds various controls (ComboBoxes,
DataGrids). In Build a
DB2 Bound Data Application using Visual Studio 2005, I showed you an
alternative way to even more quickly build a WinForm Windows application using
a data grid that binds to your DB2 data server. You don’t specifically bind
controls to an application: it’s even easier than that.
In this article, you can use either of those methods to
build a new application, but I want to show you how to use a FILLBY method to pass dynamic parameters to
the application, and then surprise you with a twist at the end.
The move from DataAdapters to TableAdapters
Although I didn’t spell it out in my previous DB2 9 and
Visual Studio 2005 articles, the Visual Studio 2005 IDE adds a new helper class
called a TableAdapter, which improves drag-and-drop application
development. A TableAdapter is created automatically when you drag a data
source from the Data Sources view onto a designer palette. The
TableAdapter in Visual Studio 2005 replaces the DataAdapter that was part of Microsoft
Visual Studio.NET 2003, which Microsoft has now deprecated in Visual Studio
2005.
One unique characteristic about TableAdapters is that they
are not found in the .NET 2.0 Framework. Unlike typed data sets, which inherit
from the System.Data.DataSet class,
TableAdapters are entirely generated by Visual Studio 2005 using the data model
you create with the Data Source Configuration Wizard, or in the Data Set
Designer.
TableAdapters abstract the database type away from
application code, which lends itself to more flexibility for application
deployment. For example, let’s say you have developed your application using SQL
Server 2005. Later you decide to port that database to DB2 running on Linux,
UNIX, or Windows. In the .NET 1.0 and .NET 1.1 Frameworks, which were
integrated into Visual Studio.NET 2002 and Visual Studio.NET 2003, you would
have had to change the object types you were using to access the database; in
Visual Studio 2005, it’s a completely different (and more streamlined) story.
Building an application using the FILLBY method
To build an application using the FILLBY method in your application’s tool strip, perform the following
steps:
1. Create
a new C# application, called MyFILLBYProject, by selecting File>New Project>Windows Application, selecting Visual Studio C# (which
may be under Other Languages depending on how you set up your IDE),
entering the name in the Name field, and clicking OK.

2. Open
the Server Explorer (by pressing Ctrl+Alt+S or by selecting View>Server Explorer from the menu bar), and
select a table. (In my example, I selected the XTREME table,
which I created in the SAMPLE database, but you can use any table you want.)
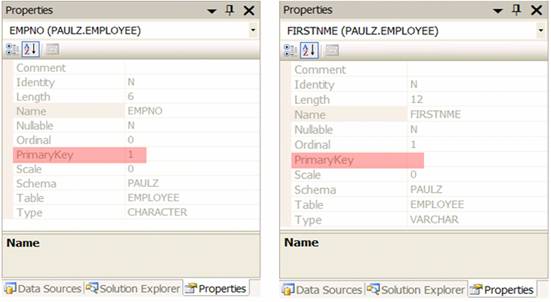
View the properties of your table’s columns by selecting Properties from
the right-click context menu and see if your table has a primary key.
A column that is defined as a
table’s primary key has a 1 in the Primary Key property field, while
a column that is not a primary key has a 0 (or may be blank).
For this article, the table you
select doesn’t need a primary key because I’ll show you how to use the tool
strip to filter data with a FILLBY
method. However, if the table you select doesn’t have a primary key, you won’t
be able to perform INSERT, UPDATE, and DELETE
operations on this data. The DB2CommandBuilder
uses a primary key for these types of data operations in order to build the corresponding
statements that it uses to change the underlying table’s row.
It’s easy to understand this requirement
when you think about it. A data set is a disconnected data persistence
container. When the DataAdapter
reconnects to the actual data server to process any data change requests, how
can it be sure it will change the data for the row that was fetched? Using a primary
key, of course! With a primary key, the DB2CommandBuilder
can build a WHERE clause for the dirty
row to ensure that it is positioned on the same row in the database as the data
set. If there is no primary key, then the DB2CommandBuilder
cannot guarantee it is positioned on the same row, and will not build statements
to change data. You can, of course, work around this method if you know the
metadata of the table and hand-generate these data manipulation statements
(DML) yourself. However, we want a slick and easy solution, so if you plan to
code any INSERT, UPDATE, and DELETE
operations into your application, ensure that you have defined a primary key on
the table where the data resides.
3. Ensure
that the Add Data Source view is displayed in Visual Studio 2005 by
pressing Shift+Alt+Delete or selecting Data>Show Data Sources from the menu bar.
4. Click
Add New Data Source in the Data Sources view, select Database,
and click Next:
5. Select
the SAMPLE database from the Which data connection should your application
use to connect to the database? drop–down list.
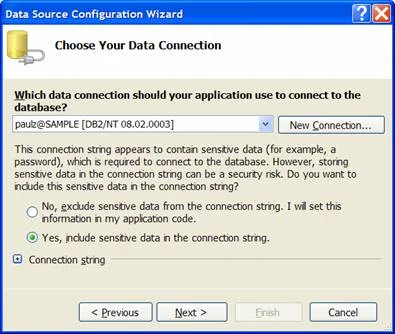
6. Select
the Yes, include sensitive data in the connection string radio button,
and click Next. (I’m assuming that you’re just working on your own test
machine here and notice that Visual Studio 2005 collapses the Connection
string box to hide these details from prying eyes.)
7. Accept
the defaults on the next pane of this wizard. Click Next.
8. Expand
the Tables toggle, select the table that you want to include in your application,
and click Finish:
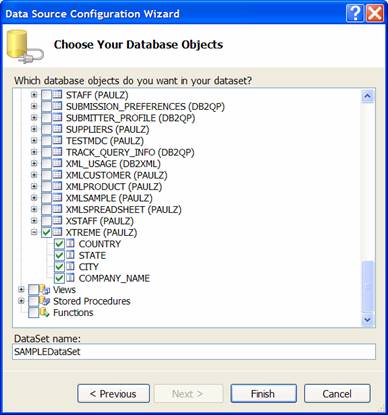
You can select multiple sources
from your underlying data server to populate the disconnected data set. In the
previous figure, I’ve added a single table called XTREME (and all of its
columns). You could have multiple tables, or a combination of tables and views.
In addition, you could even use a function or stored procedure to populate the
data set. (I will show you this method in a future article.)
After you’ve added the data set,
the Visual Studio 2005 IDE should look like this:
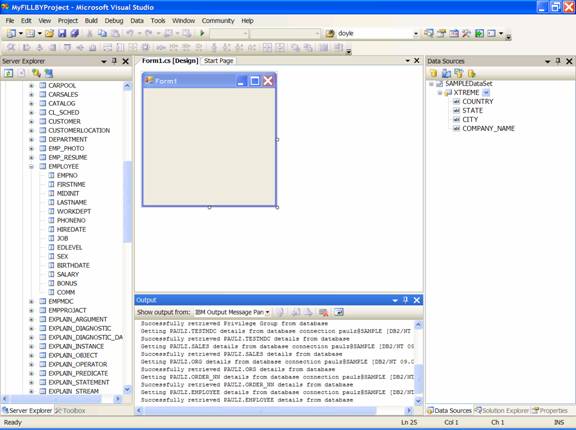
Note that your table has populated
a data set in the Data Sources view. Expand it to see all of its
contents if it isn’t automatically expanded for you.
9. Use
the left mouse button to select and drag two columns from your data set to your
Windows Application form, and then resize the data grid so it looks like this:
10. Now add a DataGridView to
list all the data in the data set from Toolbox and bind it to the <your_table_name>BindingSource
object such that the designer palette looks like this:

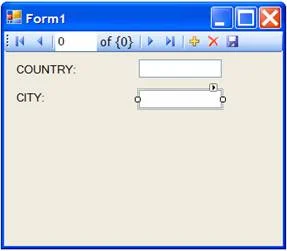
11. Press F5 to build
your application. It will look similar to this:
