Objective:
Use
this procedure to make a copy of the Reporting Services 2005 sample OLAP report, Sales Reason Comparisons.
Background:
Using a copy of an existing sample
report within a practice exercise allows us to get quickly to the procedure
that forms the focus of an article. We can therefore avoid the lengthy
preparation that might be required to simply create a realistic setting within
which to work with a specific report component. Creating a “clone” of a report means we can make
changes to a fully functional copy while retaining the original sample in a
pristine state for other purposes, such as using it to accompany relevant
sections of the Books Online, and other documentation, as a part of
learning more about Reporting Services.
From
within the open Adventure Works Reports Sample project, in the SQL Server Business Intelligence
Development Studio,
take the following steps:
1.
Right-click
the Reports folder underneath the Shared Data Sources folder, in
the Solution Explorer.
2.
Select Add
–> Existing Item … from the cascading context menus
that appear, as shown in Illustration 1.
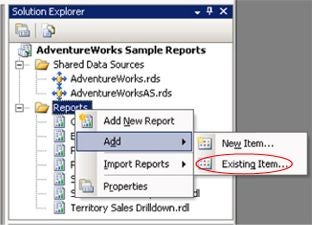
Illustration 1: Adding
the Report to the Project …
The Add
Existing Item – AdventureWorks Sample Reports dialog appears.
3.
Navigate to
the actual location
of the sample reports, if the dialog has not defaulted thereto already.
NOTE: The sample reports are installed, by default (and, therefore, subject
to be installed in a different location on our individual machines), in the
following location
C:\Program
Files\Microsoft SQL Server\90\Samples\Reporting Services\Report
Samples\AdventureWorks Sample Reports
An
example of the Add Existing Item – AdventureWorks Sample Reports dialog,
having been pointed to the sample Reports folder (which contains the Sales
Reason Comparisons report file we seek), appears as partially shown in Illustration 2.
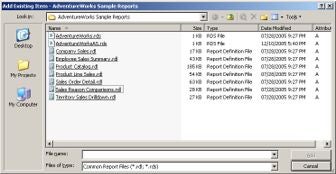
Illustration 2:
Navigating to the Sample Reports Folder …
4.
Right-click
the Sales Reason Comparisons report inside the dialog.
5.
Select Copy
from the context menu that appears, as depicted in Illustration 3.

Illustration 3:
Performing a Quick Copy of the Sales Reason Comparisons Report
6.
Right-click
somewhere in the white space inside the Add Existing Item – AdventureWorks Sample Reports dialog.
7.
Select Paste
from the context menu that appears, as shown in Illustration 4.
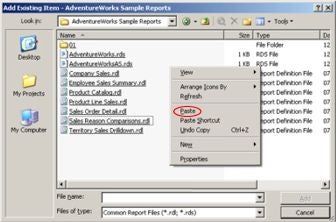
Illustration 4: Select
Paste within the New Folder …
A copy
of the Sales Reason Comparisons report appears within the dialog.
8.
Right-click
the new file.
9.
Select Rename
from the context menu that appears.
10.
Type the
following name in place of the highlighted existing name:
DBJ_OLAP_Report.rdl
NOTE: Be sure to include the .rdl extension in the file name.
The
renamed copy of the Sales Reason Comparisons sample report appears as
depicted in Illustration 5.
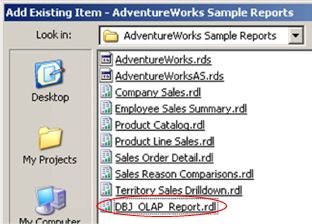
Illustration 5: The
New Report File, DBJ_OLAP_Report.rdl
11.
Click the
white space to the right of the file name, to accept the new name we have
assigned.
12.
Re-select the
new file by clicking it.
13.
Click Add
on the dialog box to add the new report to report project AdventureWorks Sample
Reports.
DBJ_OLAP_Report.rdl appears in the Reports folder,
within the AdventureWorks
Sample Reports project tree in the Solution Explorer, as shown in
Illustration 6.
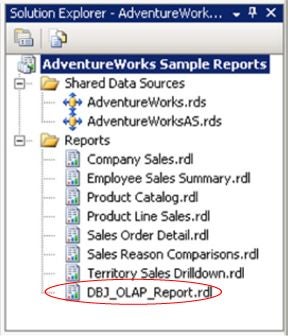
Illustration 6: The New
Report Appears in Solution Explorer – Report Folder
14.
Right-click DBJ_OLAP_Report.rdl within
the Solution Explorer.
15.
Select Open
from the context menu that appears, as depicted in Illustration 7.
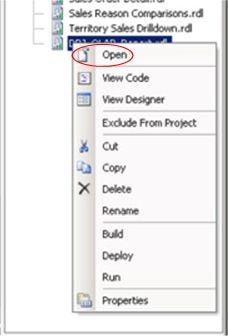
Illustration 7: Opening
the New Report …
DBJ_OLAP_Report.rdl opens in Layout view, and
appears as shown in Illustration
8.
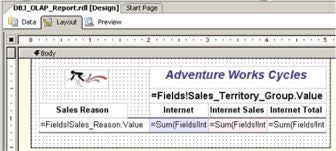
Illustration 8: Our
Report Opens in Layout View …
Let’s
preview the report, so as to get a feel for its general operation prior to
performing our enhancements.
16.
Click the Preview
tab to execute DBJ_OLAP_Report.rdl.
Execution
begins (the report initially executes with the default parameter setting). Once
executed, the report appears as depicted in Illustration 9.
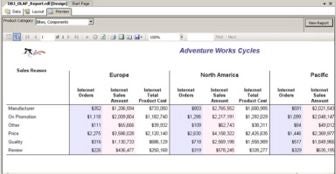
Illustration 9: The
Report Appears with Default Parameter Selection
17.
Click the Layout
tab to return to the Layout view.
18.
Select the File
–> Save All from the main menu, to save our
work, as shown in Illustration 10.
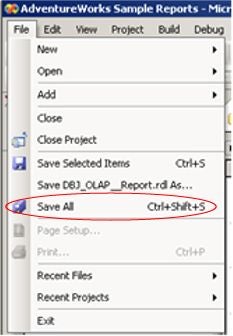
Illustration 10: Saving
Our Work …
We now
have a basic OLAP report file within our Reporting Services 2005 project,
within which we can perform the various steps that form the subject focus of
our article.